Hydrangeas are some of the most beloved plants in home gardens, thanks to their lush foliage and vibrant, ever-changing blooms. These deciduous shrubs bring charm and elegance to any outdoor space, with varieties ranging from compact one-meter bushes to towering specimens that can reach up to 15 meters in height. Their root system is made up of a thick, woody taproot that provides stability and many finer roots that absorb water and nutrients from the soil. The flowers, though individually small, bloom in large, rounded or flat clusters that create a stunning visual display throughout the growing season.
Hydrangeas bloom from early June through October, offering a breathtaking palette of colors—from soft pinks and creamy whites to vivid purples, deep blues, and even green-tinged shades as the season winds down. As the nights cool at the end of summer, their blooms fade into more muted, earthy tones, adding a graceful beauty that lingers into the fall. Even after blooming, the plant’s black, wrinkled seeds remain in the flower heads, making it easy to propagate new plants without much effort.
If you’ve been following our channel, you’ve likely seen our videos on hydrangea care, pruning techniques, and how to alter flower colors from pink to blue and back again. Today, we’re turning our attention to propagation—specifically, how to grow new hydrangeas using simple, effective methods that you can try at home.
Let’s start with soil preparation. Before planting cuttings, it’s important to create the right environment for root development. A mix of standard potting soil and perlite is highly recommended. Perlite, a naturally occurring volcanic rock, expands dramatically when heated, becoming lightweight and ideal for aerating soil. Its neutral pH makes it suitable for any garden, and its structure helps maintain proper moisture balance. Perlite absorbs excess water and slowly releases it as the soil dries out, which helps prevent root rot while ensuring the cutting stays hydrated. It also holds onto nutrients from fertilizers, allowing plants to benefit over time. By improving airflow and supporting beneficial organisms like earthworms and nematodes, perlite creates a soil environment that helps young roots thrive.
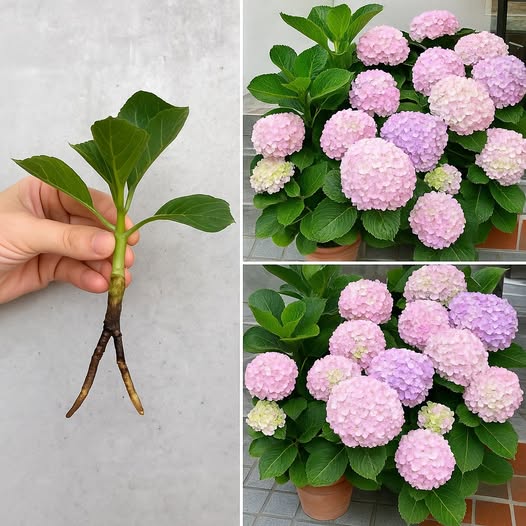
Next comes selecting the right cutting. Choose a healthy, green stem from the current year’s growth. It should be flexible and show no signs of disease or damage. Avoid older, woody stems. Look for one with at least three buds, then make a clean, angled cut about one centimeter below the lowest bud. The cutting should be around 15 centimeters long—long enough to establish roots but not so long that it drains the plant’s energy.
Once you’ve chosen your cutting, gently remove all but the topmost leaves. There’s no need for scissors—just push the leaves to the side using your fingers. Trim the remaining leaves to reduce their size. This minimizes water loss and encourages the plant to focus its energy on forming roots rather than sustaining unnecessary leaf growth.
Place the prepared cutting into the soil mixture. Be sure the buds are facing upward and press the soil gently around the base to hold it in place. Water the cutting generously. The perlite will help manage moisture levels, but you’ll still need to check the soil regularly to make sure it doesn’t dry out. While some gardeners use rooting hormone to speed up the process, hydrangeas generally root well on their own, so it’s completely optional.
Keep the cutting in a shaded location—out of direct sunlight—to protect it from drying out and to maintain a stable, humid environment. If you’re expecting wide temperature swings between day and night, consider placing a clear plastic bottle or bag over the pot to create a greenhouse effect. This will help trap moisture and warmth, promoting faster root development.
If you prefer an even simpler method, you can propagate hydrangeas in water. Take a similar green cutting, remove most of the leaves, and trim the remaining two. Place the cutting in a glass of clean water and set it in a shaded area. This method allows you to monitor root growth closely, and once roots have developed, you can transfer the cutting to soil.
There’s also a technique called layering, which works well if you already have mature hydrangeas in your yard. Choose a low, flexible branch that receives partial shade. Dig a shallow trench nearby, remove the leaves from the part of the branch that will be buried, and bend the branch into the trench. Cover it with soil, leaving the tip exposed. Use a rock or small stake to keep the branch in place, and water the area regularly. Over time, roots will develop at the buried section. By the following spring or late summer, you can separate the new plant from the mother plant and transplant it either into a pot or directly into the ground.
No matter which method you choose—cuttings in soil, water propagation, or layering—caring for your young hydrangeas properly is key. Keep the soil consistently moist, provide adequate shade, and protect the plants from harsh weather. Once the new roots are established, you can transplant your hydrangeas to their permanent location, where they will flourish and become a highlight of your garden.
Propagating hydrangeas is an easy and rewarding way to grow your garden without buying new plants. With a bit of patience and the right techniques, you can multiply these beautiful shrubs and enjoy their spectacular blooms year after year. Whether you’re a seasoned gardener or a beginner, these methods offer a great way to deepen your connection with your garden and watch new life grow from your own hands.